详解认证中心的配置
JeremyJone ... 2025-3-15 大约 11 分钟
# 详解认证中心的配置
在 IdentityServer 中,需要我们进行配置的内容,大体分成:IdentityResource、ApiScope、ApiResource 和 Client,它们都是在 IdentityServer4.Models 中定义的。
我们在创建一个 Ids 服务之后,也要首先进行配置初始数据(之前写过的 Config.cs),也就是配置这些内容。
今天要详细梳理一下这些配置,因为它们尤为重要。我们按照官方示例依次梳理:
public static IEnumerable<IdentityResource> IdentityResources => new IdentityResource[] {};

public static IEnumerable<ApiScope> ApiScopes => new ApiScope[] {};

public static IEnumerable<ApiResource> ApiResources => new ApiResource[] {};

public static IEnumerable<Client> Clients => new Client[] {};
1
2
3
4
5
6
7
2
3
4
5
6
7
# IdentityResource
IdentityResource 是预定义的用户身份资源,它包含一些用户的基本信息,如:个人信息、地址、电话号码、邮箱等。
通常,OpenId 和 Profile 是一定给出的,尤其是 OpenId,默认就是强制使用,用户无法取消选择。因为没有这两项信息,就无法确定是哪个用户,而且这些信息本身就是公开的。其余都是可以选项,也都可以调整。
# IdentityResource 的作用
IdentityResource 用于确认用户身份,它所包含的内容通常会在 id_token 中,主要是允许哪些资源(claim)可以添加到 id_token 中。尤其是当需要一些自定义授权权限时,这些是必要且灵活的选择。
# 创建 IdentityResource 内容
public static IEnumerable<IdentityResource> IdentityResources =>
    new IdentityResource[]
    {
        new IdentityResources.OpenId(),
        new IdentityResources.Profile(),
        new IdentityResources.Email(),
        new IdentityResources.Phone(),
        new IdentityResources.Address()
    };
1
2
3
4
5
6
7
8
9
2
3
4
5
6
7
8
9
# 自定义 IdentityResource 内容
这些是预定义好的五项内容,我们还可以通过自定义的方式进行内容的增加:
new IdentityResource("roles", "角色信息", new List<string> {JwtClaimTypes.Role})
1
这些身份信息读取用户的 Claim,将其放入 token 中,我们得到的 token 中就会包含这些信息,从而达到获取用户信息的目的。
比如:我们查看预定义的 new IdentityResources.Email() 源码,就会看到其内部已经填写好 JwtClaimTypes.Email 与 JwtClaimType.EmailVerified 两个 claim。当我们的客户端配置了 Email 资源时,获取到的 token 中就会包含这两个 claim。
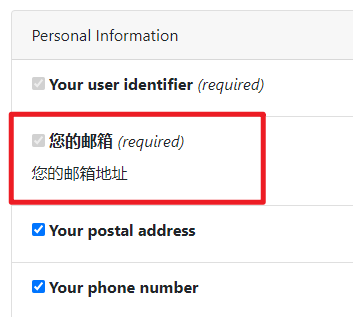
# 修改 IdentityResource 内容
框架给我提供了非常方便好用的扩展空间,通过构造函数就可以替换掉我们不希望的内容:
new IdentityResources.Email
{
    //Name = IdentityServerConstants.StandardScopes.Email,
    DisplayName = "您的邮箱",
    Description = "您的邮箱地址",
    Required = true,
    //Emphasize = true,
    UserClaims = new List<string>{ IdentityServerConstants.StandardScopes.Email }
}
1
2
3
4
5
6
7
8
9
2
3
4
5
6
7
8
9
这样配置之后,它将显示为中文而不是默认的英文内容,并且它是必须项,用户无法取消选择,同时在获取到的 token 中也没有了默认的 EmailVerified 项。

# IdentityResource 的参数
- Enabled
否启用了该资源并且可以请求该资源。默认为 true。
- Name
身份资源的唯一名称。该值对应于客户端授权请求中的 scope 参数的值。
- DisplayName
显示的名称,如在同意界面中将使用此值。
- Description
显示的描述,如在同意界面中将使用此值。
- Required
指定用户是否可以在同意界面中取消选择范围(如果同意界面要实现这样的功能)。false 表示可以取消,true 则为必须。默认为 false。
- Emphasize
指定同意界面是否会强调此范围(如果同意界面要实现此功能)。将此设置用于敏感或重要的作用域。默认为 false。
- ShowInDiscoveryDocument
指定此范围是否显示在发现文档中。默认为 true。
- UserClaims
id_token中应包含的相关用户声明类型的列表。
# ApiScope
ApiScope 顾名思义就是对一个 OAuth API 的范围定义。
# 版本说明
老版本使用 ApiResource 即可,而新的版本已经开始使用 ApiScope 进行配置。
请注意
目前大部分能在网上上找到的博客、帖子,基本上还是老版本的内容,很多视频也是直接使用的 ApiResource,已经不再适用新版本了,需要注意。
# ApiScope 的作用
ApiScope 主要用于定义一个 Api 的作用域范围,该范围可以很小。只有当客户端配置的域名与该域名相匹配时才验证通过,否则返回 invalid_scope。
# 创建 ApiScope
创建一个 ApiScope 十分简单方便:
new ApiScope("mvc", "Mvc Client")
1
它真的仅仅是一个范围的作用,作用就是控制 OAuth API 的范围。
# ApiScope 的参数
- Enabled
是否启用此资源并且可以请求该资源。默认为 true。
- Name
API 的唯一名称。该值用于自检身份验证,并将添加到
access_token中的audience中。
- DisplayName
显示的名称。可以在同意界面中使用该值。
- Description
显示的描述,可以在同意界面中使用该值。
- UserClaims
应包含在
access_token中的相关用户声明类型的列表。
# 通过 appsettings.json 配置 ApiScope
使用 AddInMemoryApiScope 扩展方法,可以通过配置文件添加 ApiScope:
"IdentityServer": {
    "IssuerUri": "urn:sso.company.com",
    "ApiScopes": [
        {
            "Name": "IdentityServerApi"
        },
        {
            "Name": "resource1.scope1"
        },
        {
            "Name": "resource2.scope1"
        },
        {
            "Name": "scope3"
        },
        {
            "Name": "shared.scope"
        },
        {
            "Name": "transaction",
            "DisplayName": "Transaction",
            "Description": "A transaction"
        }
    ]
}
1
2
3
4
5
6
7
8
9
10
11
12
13
14
15
16
17
18
19
20
21
22
23
24
25
2
3
4
5
6
7
8
9
10
11
12
13
14
15
16
17
18
19
20
21
22
23
24
25
然后将配置部分传递给 AddInMemoryApiScopes 方法:
AddInMemoryApiScopes(configuration.GetSection("IdentityServer:ApiScopes"))
1
# ApiResource
ApiResource 定义的是一个 web API 资源。它代表客户端需要访问的功能。通常,它们是基于 HTTP 的终点(API),亦可是消息队列终点或类似的终点。
# ApiResource 在新版本中的作用
新版本的 ApiResource 不再适用于客户端的 AllowedScopes 作用域,反而是作为一个更复杂更大的概念而存在。简单来说,每个 API 都可以具有 scope,一些 scope 是针对当前 resource 专属的,而另一些 scope 则是共享与多个 resouce 的。它们的关系好像:
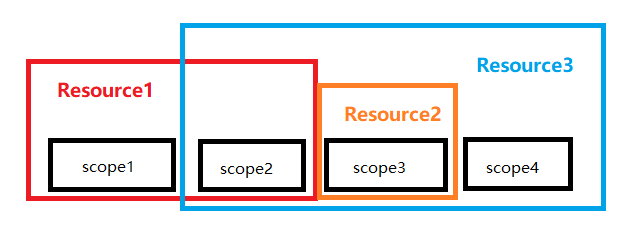
随着 scope 越来越大,需要引入某种命名空间来组织这些作用域,或者将它们分组在一起并获得一些更高层次的结构,比如 access_token 中的 audience claim。此时需要对这些 scope 进行资源整合 -- 将它们配置到一个或多个 ApiResouce 中。
# ApiResource 的参数
- Enabled
否启用了该资源并且可以请求该资源。默认为 true。
- Name
API 的唯一名称。该值用于自检身份验证,并将添加到
access_token中的audience中。
- DisplayName
显示的名称。可以在同意界面中使用该值。
- Description
显示的描述,可以在同意界面中使用该值。
- ApiSecrets
用于自检端点。该 API 可以使用 API 名称和密码进行自检身份验证。
- AllowedAccessTokenSigningAlgorithms
access_token允许的签名算法列表。如果为空,将使用服务器默认的签名算法。
- UserClaims
应包含在
access_token中的相关用户声明类型的列表。
- Scopes
API Scope 名称列表。
# 定义 ApiResource
在定义 ApiResource 之前,需要首先定义一些 Scope,比如:
public static IEnumerable<ApiScope> GetApiScopes()
{
    return new List<ApiScope>
    {
        // invoice API specific scopes
        new ApiScope(name: "invoice.read",   displayName: "Reads your invoices."),
        new ApiScope(name: "invoice.pay",    displayName: "Pays your invoices."),

        // customer API specific scopes
        new ApiScope(name: "customer.read",    displayName: "Reads you customers information."),
        new ApiScope(name: "customer.contact", displayName: "Allows contacting one of your customers."),

        // shared scope
        new ApiScope(name: "manage", displayName: "Provides administrative access to invoice and customer data.")
    };
}
1
2
3
4
5
6
7
8
9
10
11
12
13
14
15
16
2
3
4
5
6
7
8
9
10
11
12
13
14
15
16
现在,我们使用 ApiResource 对上面的作用域定义两个逻辑 API:
public static readonly IEnumerable<ApiResource> GetApiResources()
{
    return new List<ApiResource>
    {
        new ApiResource("invoice", "Invoice API")
        {
            Scopes = { "invoice.read", "invoice.pay", "manage" }
        },

        new ApiResource("customer", "Customer API")
        {
            Scopes = { "customer.read", "customer.contact", "manage" }
        }
    };
}
1
2
3
4
5
6
7
8
9
10
11
12
13
14
15
2
3
4
5
6
7
8
9
10
11
12
13
14
15
如上,我们就有了两个 ApiResource,它的功能如下:
- 支持 Jwt 的
aud声明,audience 值就是ApiResource的值 - 支持在所有包含的范围内添加普通用户声明
- 支持通过添加
ApiSecret进行自检 - 支持为资源配置
access_token的签名算法
# 通过 appsettings.json 配置 ApiResource
与 ApiScope 一样,ApiResource 同样可以通过配置文件添加:
"IdentityServer": {
    "IssuerUri": "urn:sso.company.com",
    "ApiResources": [
        {
            "Name": "resource1",
            "DisplayName": "Resource #1",

            "Scopes": [
                "resource1.scope1",
                "shared.scope"
            ]
        },
        {
            "Name": "resource2",
            "DisplayName": "Resource #2",

            "UserClaims": [
                "name",
                "email"
            ],

            "Scopes": [
                "resource2.scope1",
                "shared.scope"
            ]
        }
    ]
}
1
2
3
4
5
6
7
8
9
10
11
12
13
14
15
16
17
18
19
20
21
22
23
24
25
26
27
28
2
3
4
5
6
7
8
9
10
11
12
13
14
15
16
17
18
19
20
21
22
23
24
25
26
27
28
然后将配置部分通过 AddInMemoryApiResource 方法添加:
AddInMemoryApiResources(configuration.GetSection("IdentityServer:ApiResources"))
1
# 如何使用 ApiResource
根据上面的功能介绍,总结下来就是在客户端配置对应的 Scope,比如 "customer.read",系统会自动查找对应的资源名称,如果存在,就给声明中的 audience 字段添加 ApiResource 的名称。
如果添加了多个 Scope,比如 "customer.read" 与 "invoice.read",则会在 audience 字段中添加多个值 -- 即: ["customer", "invoice"]。
同时要注意,如果使用内存模式,在添加到服务时,要先添加 AddInMemoryApiScopes(Config.ApiScopes) 再添加 AddInMemoryApiResources(Config.ApiResources),否则永远找不到 ApiResource。
# 何时使用 ApiResource
对于对于需要进行资源认证的客户端,需要将所对应的 Scope 配置到 Resource 中,并且设置资源的秘钥。客户端验证名称和秘钥即可。
比如前后端分离,前端通过 oidc-client 获取到 token,后端服务器使用该方法可以验证 token。
# Client
这个很好理解,就是客户端,一条配置就是一个客户端。客户端就是一个可以从身份服务器请求令牌的应用、网站等程序。
# 定义 Client
定义 Client 时,通常会有以下通用设置:
- 唯一的 Client Id
- 一个秘钥(需要的话)
- 授权类型
- 重定向 URI
- 访问范围列表
# 服务器访问服务器的客户端 ClientCredentials
该情况不存在用户的交互行为,仅仅是服务器之间的通信,属于高度可信的通信状态。比如服务集群中的两台服务器之间的数据交互行为。这种情况使用 ClientCredentials 类型即可。大体配置如下:
public static IEnumerable<Client> Clients =>
    new []
    {
        new Client
        {
            // 客户端 Id
            ClientId = "jz",
            // 客户端获取 Token
            ClientSecrets = new[] {new Secret("www.jeremyjone.com".Sha256()) },
            // 使用客户端认证
            AllowedGrantTypes = GrantTypes.ClientCredentials,
            // 允许访问的 Api
            AllowedScopes = new[] { "api.jeremyjone.com" }
        }
    };
1
2
3
4
5
6
7
8
9
10
11
12
13
14
15
2
3
4
5
6
7
8
9
10
11
12
13
14
15
# 交互客户端 Code
该情况通常是具有交互行为的 MVC 的 Web 应用程序,或者移动应用程序。
它包含两个物理操作:
authorization:所有的交互行为(登录、同意等)都通过浏览器发生front-channel的步骤中,此步骤生成一个authorization_code表示font-channel的结果。code:通过back-channel的步骤将获取到的authorization_code与请求令牌交换,同时机密客户端需要验证身份。
这个流程具有不错的安全性,但还是可能泄露个人数据,所以需要使用 PKCE 秘钥模式,它在 .net core 中默认开启。对于 PKCE,详情请阅读此处。
大体配置如下:
new Client
{
    ClientId = "interactive",
    ClientSecrets = { new Secret("49C1A7E1-0C79-4A89-A3D6-A37998FB86B0".Sha256()) },

    AllowedGrantTypes = GrantTypes.Code,

    RedirectUris = { "http://localhost:44300/signin-oidc" },
    PostLogoutRedirectUris = { "http://localhost:44300/signout-callback-oidc" },

    RequireConsent = true,
    AllowOfflineAccess = true,
    AllowedScopes = {
        IdentityServerConstants.StandardScopes.OpenId,
        IdentityServerConstants.StandardScopes.Email,
        IdentityServerConstants.StandardScopes.Profile
    }
}
1
2
3
4
5
6
7
8
9
10
11
12
13
14
15
16
17
18
2
3
4
5
6
7
8
9
10
11
12
13
14
15
16
17
18
# 密码模式 Password
该情况应用于绝对信任的站点交互,因为第三方客户端会收集用户的密码信息。一般情况下不推荐使用该方式,但不排除一些绝对信任的情况,如公司内部不同部门之间登录的情况等。
大体配置如下:
new Client
{
    ClientId = "pwd client",
    ClientSecrets = { new Secret("pwd client secret".Sha256()) },
    AllowedGrantTypes = GrantTypes.ResourceOwnerPassword,
    AllowedScopes =
    {
        IdentityServerConstants.StandardScopes.OpenId,
        IdentityServerConstants.StandardScopes.Profile,
        IdentityServerConstants.StandardScopes.Email,
        IdentityServerConstants.StandardScopes.Address
    }
}
1
2
3
4
5
6
7
8
9
10
11
12
13
2
3
4
5
6
7
8
9
10
11
12
13
# 隐匿模式 Implicit
该模式相对来说比较常用吧,随着前后端分离,前端使用的情况还是比较多的。
该模式安全性比密码方式高很多,用户直接在身份服务器登录,客户端不需要知道用户密码。缺陷是前端需要保存对应的 token,而考虑到 token 的安全性,可以适当缩短有效时间。
大体的配置方式:
new Client
{
    ClientId = "implicit client",
    ClientName = "Implicit 客户端",
    ClientUri = "http://localhost:8080",

    AllowedGrantTypes = GrantTypes.Implicit,
    AllowAccessTokensViaBrowser = true,
    RequireConsent = true,
    AccessTokenLifetime = 60 * 5,
    AlwaysIncludeUserClaimsInIdToken = true,

    RedirectUris =
    {
        "http://localhost:8080/callback",
        "http://localhost:8080/callback-refresh"
    },

    PostLogoutRedirectUris =
    {
        "http://localhost:8080/logout"
    },

    AllowedCorsOrigins =
    {
        "http://localhost:8080"
    },

    AllowedScopes =
    {
        "api.read", "api.create", "api.update", "api.delete", "mvc.delete",
        IdentityServerConstants.StandardScopes.OpenId,
        IdentityServerConstants.StandardScopes.Profile,
        IdentityServerConstants.StandardScopes.Email
    }
}
1
2
3
4
5
6
7
8
9
10
11
12
13
14
15
16
17
18
19
20
21
22
23
24
25
26
27
28
29
30
31
32
33
34
35
36
2
3
4
5
6
7
8
9
10
11
12
13
14
15
16
17
18
19
20
21
22
23
24
25
26
27
28
29
30
31
32
33
34
35
36
# 混合模式 Hybrid
这个混合是指特定的组合了 Implicit 与 Code 的两种方式,它也是使用比较多的模式。对比单纯的 Code 模式,它结合了隐匿模式,更加适合 Web 应用程序、原生桌面以及移动应用程序。
大体的配置方式:
new Client
    {
        ClientId = "hybrid client",
        ClientName = "Hybrid 客户端",
        ClientSecrets = {new Secret("hybrid client secret".Sha256())},

        AllowedGrantTypes = GrantTypes.Hybrid,
        AccessTokenType = AccessTokenType.Reference,
        RequireConsent = true,
        RequirePkce = false,
        AllowAccessTokensViaBrowser = true,
        RedirectUris = {"http://localhost:7100/signin-oidc"},
        PostLogoutRedirectUris = {"http://localhost:7100/signout-callback-oidc"},
        AllowOfflineAccess = true,
        AlwaysIncludeUserClaimsInIdToken = true,
        AllowedScopes =
        {
            "mvc.read", "mvc.create", "mvc.update", "mvc.delete",
            "api.read", "api.create", "api.update", "api.delete",
            IdentityServerConstants.StandardScopes.OpenId,
            IdentityServerConstants.StandardScopes.Email,
            IdentityServerConstants.StandardScopes.Address,
            IdentityServerConstants.StandardScopes.Phone,
            IdentityServerConstants.StandardScopes.Profile,
            "roles",
        }
    }
1
2
3
4
5
6
7
8
9
10
11
12
13
14
15
16
17
18
19
20
21
22
23
24
25
26
27
2
3
4
5
6
7
8
9
10
11
12
13
14
15
16
17
18
19
20
21
22
23
24
25
26
27
# 更多
关于本节的具体代码,可以查看代码示例。有完整的多端,可以直接运行测试。