数据的持久化(使用数据库)
JeremyJone ... 2025-3-15 大约 11 分钟
# 数据的持久化(使用数据库)
前面只是一个最简单的基础使用方案,虽然已经实现了认证与授权,但是明显并不能满足生产需求,下面就按不同需求进行配置。
上面的例子中,所有数据都在内存中,并不能持久化。如果要数据持久化,上数据库是必然的。
# 创建使用数据库的项目
通过命令可以快速创建一个带有模板的项目:
dotnet new is4ef1下载 示例代码 可以获取完整的配置内容。
也可以创建空项目后按照下面内容自行配置。
# 配置数据库服务
使用上面命令创建的项目会包含比较完整的内容,下面对项目稍作修改。
# 添加数据库相关依赖
IdentityServer4.AspNetIdentity(4.1.2)
IdentityServer4.EntityFramework(4.0.0)
Microsoft.EntityFrameworkCore.Tools(3.1.5)
Microsoft.AspNetCore.Identity.EntityFrameworkCore(3.1.5)
Pomelo.EntityFrameworkCore.MySql(3.1.1)
1
2
3
4
5
2
3
4
5
注意
截至 2021.3.20,Pomelo.EntityFrameworkCore.MySql 不支持 Net5(想尝鲜可以使用 alpha-5 版本),项目是 net core 3.1 的,对应的 Pomelo.EntityFrameworkCore.MySql 使用的是 3.1.1 版本,对应的 Microsoft.EntityFrameworkCore.Tools 也应该是 3.x 版本。
提示
本配置为 MySQL,如果使用其他数据库,请自行下载。
# 添加数据库连接字符串
在 appsettings.json 中添加如下内容:
{
  "ConnectionStrings": {
    // 使用命令创建的项目自带默认字符串,连接 SQLite 的
    "DefaultConnection": "Data Source=IdentityServer.db;",
    // 添加 MySQL 的连接字符串
    "MySQL": "server=192.168.1.126;userid=jeremyjone;pwd=123456;port=3306;database=ids-test"
  }
}
1
2
3
4
5
6
7
8
2
3
4
5
6
7
8
# 注册数据库的相关服务
在 Startup.cs 的配置服务中添加如下内容:
# 添加数据库上下文
var connectionMySql = Configuration["ConnectionStrings:MySQL"];
if (string.IsNullOrWhiteSpace(connectionMySql))
{
    throw new Exception("数据库配置异常,请检查 appsettings.json");
}

services.AddDbContext<ApplicationDbContext>(options => options.UseMySql(connectionMySql));
1
2
3
4
5
6
7
2
3
4
5
6
7
# 配置身份参数
services.AddIdentity<ApplicationUser, ApplicationRole>()
    // 添加实体库
    .AddEntityFrameworkStores<ApplicationDbContext>()
    .AddDefaultTokenProviders();
1
2
3
4
2
3
4
# 配置 IS4 为数据库模式
空项目不需要添加被注释掉的内容。如果使用命令创建的项目,会默认使用 SQLite 进行配置,按中文注释稍作修改即可。
var migrationsAssembly = typeof(Startup).GetTypeInfo().Assembly.GetName().Name;
var builder = services.AddIdentityServer(options =>
    {
        options.Events.RaiseErrorEvents = true;
        options.Events.RaiseInformationEvents = true;
        options.Events.RaiseFailureEvents = true;
        options.Events.RaiseSuccessEvents = true;

        // see https://identityserver4.readthedocs.io/en/latest/topics/resources.html
        options.EmitStaticAudienceClaim = true;
    })
    // 注释掉测试用户,使用数据库的内容
    //.AddTestUsers(TestUsers.Users)
    // 配置 IS4 使用哪种用户模型
    .AddAspNetIdentity<ApplicationUser>()
    // this adds the config data from DB (clients, resources, CORS)
    .AddConfigurationStore(options =>
    {
        //options.ConfigureDbContext = builder => builder.UseSqlite(connectionString);
        // 使用 MySQL
        options.ConfigureDbContext = b =>
            b.UseMySql(connectionMySQL, sql => sql.MigrationsAssembly(migrationsAssembly));
    })
    // this adds the operational data from DB (codes, tokens, consents)
    .AddOperationalStore(options =>
    {
        //options.ConfigureDbContext = builder => builder.UseSqlite(connectionString);
        // 使用 MySQL
        options.ConfigureDbContext = b =>
            b.UseMySql(connectionMySQL, sql => sql.MigrationsAssembly(migrationsAssembly));

        // this enables automatic token cleanup. this is optional.
        options.EnableTokenCleanup = true;
    });

// not recommended for production - you need to store your key material somewhere secure
builder.AddDeveloperSigningCredential();
1
2
3
4
5
6
7
8
9
10
11
12
13
14
15
16
17
18
19
20
21
22
23
24
25
26
27
28
29
30
31
32
33
34
35
36
37
2
3
4
5
6
7
8
9
10
11
12
13
14
15
16
17
18
19
20
21
22
23
24
25
26
27
28
29
30
31
32
33
34
35
36
37
# 不要忘记在中间件注册使用 IS4
app.UseRouting();

// 注册使用 IS4 服务。它需要在 *路由* 之后,*授权* 之前。
app.UseIdentityServer();

app.UseAuthorization();
1
2
3
4
5
6
2
3
4
5
6
# 创建数据模型
上面配置了自定义的 ApplicationDbContext 和 ApplicationUser,因为通常用户的内容我们需要自定义,如果完全不用自定义的话,那么直接使用原型(IdentityUser)即可。
在项目根目录下新建一个 Models 文件夹并创建下面几个模型类:
# 创建自定义用户模型
// ApplicationUser.cs

public class ApplicationUser : IdentityUser<int>
{
    /// <summary>
    /// 有效
    /// </summary>
    public bool Validity { get; set; } = true;

    /// <summary>
    /// 昵称
    /// </summary>
    public string NickName { get; set; }

    /// <summary>
    /// 出生日期
    /// </summary>
    public DateTime BirthDate { get; set; }

    public ICollection<ApplicationUserRole> UserRoles { get; set; }
}
1
2
3
4
5
6
7
8
9
10
11
12
13
14
15
16
17
18
19
20
21
2
3
4
5
6
7
8
9
10
11
12
13
14
15
16
17
18
19
20
21
# 创建自定义角色模型
// ApplicationRole.cs

public class ApplicationRole: IdentityRole<int>
{
    /// <summary>
    /// 有效
    /// </summary>
    public bool Validity { get; set; } = true;

    /// <summary>
    /// 启用
    /// </summary>
    public bool Enabled { get; set; } = true;

    /// <summary>
    /// 描述
    /// </summary>
    public string Description { get; set; }

    public ICollection<ApplicationUserRole> UserRoles { get; set; }
}
1
2
3
4
5
6
7
8
9
10
11
12
13
14
15
16
17
18
19
20
21
2
3
4
5
6
7
8
9
10
11
12
13
14
15
16
17
18
19
20
21
# 创建用户角色模型
将用户和角色进行关联
// ApplicationUserRole.cs

public class ApplicationUserRole: IdentityUserRole<int>
{
    public virtual ApplicationUser User { get; set; }
    public virtual ApplicationRole Role { get; set; }
}
1
2
3
4
5
6
7
2
3
4
5
6
7
# 创建自定义数据库上下文
// ApplicationDbContext.cs

public class ApplicationDbContext : IdentityDbContext<ApplicationUser, ApplicationRole, int, IdentityUserClaim<int>, ApplicationUserRole, IdentityUserLogin<int>, IdentityRoleClaim<int>, IdentityUserToken<int>>
{
    public ApplicationDbContext(DbContextOptions<ApplicationDbContext> options) : base(options)
    {

    }

    protected override void OnModelCreating(ModelBuilder builder)
    {
        base.OnModelCreating(builder);
    }
}
1
2
3
4
5
6
7
8
9
10
11
12
13
14
2
3
4
5
6
7
8
9
10
11
12
13
14
这样就做好了数据模型,下面可以根据模型创建数据库
# 创建种子数据
# 创建配置资源与客户端
使用命令创建的项目,在根目录下已经存在一个 Config.cs 的文件。如果没有,则创建该文件并添加如下内容即可:
public static class Config
{
    public static IEnumerable<IdentityResource> IdentityResources =>
                new IdentityResource[]
                {
            new IdentityResources.OpenId(),
            new IdentityResources.Profile(),
                };

    public static IEnumerable<ApiScope> ApiScopes =>
        new ApiScope[]
        {
            new ApiScope("scope1"),
            new ApiScope("scope2"),
        };

    public static IEnumerable<Client> Clients =>
        new Client[]
        {
            // m2m client credentials flow client
            new Client
            {
                ClientId = "m2m.client",
                ClientName = "Client Credentials Client",

                AllowedGrantTypes = GrantTypes.ClientCredentials,
                ClientSecrets = { new Secret("511536EF-F270-4058-80CA-1C89C192F69A".Sha256()) },

                AllowedScopes = { "scope1" }
            },

            // interactive client using code flow + pkce
            new Client
            {
                ClientId = "interactive",
                ClientSecrets = { new Secret("49C1A7E1-0C79-4A89-A3D6-A37998FB86B0".Sha256()) },

                AllowedGrantTypes = GrantTypes.Code,

                RedirectUris = { "https://localhost:44300/signin-oidc" },
                FrontChannelLogoutUri = "https://localhost:44300/signout-oidc",
                PostLogoutRedirectUris = { "https://localhost:44300/signout-callback-oidc" },

                AllowOfflineAccess = true,
                AllowedScopes = { "openid", "profile", "scope2" }
            },
        };
}
1
2
3
4
5
6
7
8
9
10
11
12
13
14
15
16
17
18
19
20
21
22
23
24
25
26
27
28
29
30
31
32
33
34
35
36
37
38
39
40
41
42
43
44
45
46
47
48
2
3
4
5
6
7
8
9
10
11
12
13
14
15
16
17
18
19
20
21
22
23
24
25
26
27
28
29
30
31
32
33
34
35
36
37
38
39
40
41
42
43
44
45
46
47
48
其中内容都是基础配置,不再赘述。
# 创建种子用户与角色
还是在 Config.cs 文件中即可:
public static IEnumerable<ApplicationUser> Users =>
    new[]
    {
        new ApplicationUser
        {
            BirthDate = DateTime.Now,
            Email = "user1@qq.com",
            UserName = "user1",
            NickName = "用户1",
            EmailConfirmed = true
        },
        new ApplicationUser
        {
            BirthDate = DateTime.Now,
            Email = "user2@qq.com",
            UserName = "user2",
            NickName = "用户2",
            EmailConfirmed = true
        },
    };

public static IEnumerable<ApplicationRole> Roles =>
    new[]
    {
        new ApplicationRole
        {
            Name = "admin",
            Description = "管理员",
        },
        new ApplicationRole
        {
            Name = "user",
            Description = "用户",
        },
        new ApplicationRole
        {
            Name = "guest",
            Description = "访客",
        },
    };
1
2
3
4
5
6
7
8
9
10
11
12
13
14
15
16
17
18
19
20
21
22
23
24
25
26
27
28
29
30
31
32
33
34
35
36
37
38
39
40
2
3
4
5
6
7
8
9
10
11
12
13
14
15
16
17
18
19
20
21
22
23
24
25
26
27
28
29
30
31
32
33
34
35
36
37
38
39
40
# 创建种子数据的生成操作
使用命令创建的项目,在根目录下有一个 SeedData.cs 的文件,修改为如下内容。如果没有,则创建并将下面内容粘贴到文件中:
public class SeedData
{
    public static void EnsureSeedData(IServiceProvider serviceProvider)
    {
        // var services = new ServiceCollection();

        // 不需要 SQLite
        //services.AddOperationalDbContext(options =>
        //{
        //    options.ConfigureDbContext = db => db.UseSqlite(connectionString, sql => sql.MigrationsAssembly(typeof(SeedData).Assembly.FullName));
        //});
        //services.AddConfigurationDbContext(options =>
        //{
        //    //options.ConfigureDbContext = db => db.UseMySql(connectionString, sql => sql.MigrationsAssembly(typeof(SeedData).Assembly.FullName));
        //});

        // 不使用模板提供的 serviceProvider,通过 host 直接传递 ServiceProvider
        // var serviceProvider = services.BuildServiceProvider();
        using (var scope = serviceProvider.GetRequiredService<IServiceScopeFactory>().CreateScope())
        {
            scope.ServiceProvider.GetService<PersistedGrantDbContext>().Database.Migrate();

            var context = scope.ServiceProvider.GetService<ConfigurationDbContext>();
            context.Database.Migrate();
            EnsureSeedData(context);

            #region 添加用户数据

            var ctx = scope.ServiceProvider.GetService<ApplicationDbContext>();
            ctx.Database.Migrate();
            EnsureSeedData(scope);

            #endregion
        }
    }

    #region 命令创建的函数,无修改

    private static void EnsureSeedData(ConfigurationDbContext context)
    {
        if (!context.Clients.Any())
        {
            Log.Debug("Clients being populated");
            foreach (var client in Config.Clients.ToList())
            {
                context.Clients.Add(client.ToEntity());
            }
            context.SaveChanges();
        }
        else
        {
            Log.Debug("Clients already populated");
        }

        if (!context.IdentityResources.Any())
        {
            Log.Debug("IdentityResources being populated");
            foreach (var resource in Config.IdentityResources.ToList())
            {
                context.IdentityResources.Add(resource.ToEntity());
            }
            context.SaveChanges();
        }
        else
        {
            Log.Debug("IdentityResources already populated");
        }

        if (!context.ApiResources.Any())
        {
            Log.Debug("ApiScopes being populated");
            foreach (var resource in Config.ApiScopes.ToList())
            {
                context.ApiScopes.Add(resource.ToEntity());
            }
            context.SaveChanges();
        }
        else
        {
            Log.Debug("ApiScopes already populated");
        }
    }

    #endregion

    #region 创建用户和角色

    private static void EnsureSeedData(IServiceScope scope)
    {
        var userManager = scope.ServiceProvider.GetRequiredService<UserManager<ApplicationUser>>();
        var roleManager = scope.ServiceProvider.GetRequiredService<RoleManager<ApplicationRole>>();

        // 创建角色
        foreach (var role in Config.Roles)
        {
            var res = roleManager.CreateAsync(role).Result;
            if (!res.Succeeded)
            {
                throw new Exception(res.Errors.First().Description);
            }
            Console.WriteLine($"{role.Name} created!");
        }

        // 创建用户
        foreach (var user in Config.Users)
        {
            // 默认密码为 Test23
            var res = userManager.CreateAsync(user, "Test_123").Result;
            if (!res.Succeeded)
            {
                throw new Exception(res.Errors.First().Description);
            }

            // 创建用户的声明
            var claims = new List<Claim>
            {
                new Claim(JwtClaimTypes.Name, user.NickName),
                new Claim(JwtClaimTypes.Email, user.Email)
            };

            res = userManager.AddClaimsAsync(user, claims).Result;
            if (!res.Succeeded)
            {
                throw new Exception(res.Errors.First().Description);
            }

            // 创建用户的角色
            var role = user.UserName == "user1" ? "admin" : "user";
            res = userManager.AddToRoleAsync(user, role).Result;
            if (!res.Succeeded)
            {
                throw new Exception(res.Errors.First().Description);
            }

            Console.WriteLine($"{user.NickName} created!");
        }
    }

    #endregion
}
1
2
3
4
5
6
7
8
9
10
11
12
13
14
15
16
17
18
19
20
21
22
23
24
25
26
27
28
29
30
31
32
33
34
35
36
37
38
39
40
41
42
43
44
45
46
47
48
49
50
51
52
53
54
55
56
57
58
59
60
61
62
63
64
65
66
67
68
69
70
71
72
73
74
75
76
77
78
79
80
81
82
83
84
85
86
87
88
89
90
91
92
93
94
95
96
97
98
99
100
101
102
103
104
105
106
107
108
109
110
111
112
113
114
115
116
117
118
119
120
121
122
123
124
125
126
127
128
129
130
131
132
133
134
135
136
137
138
139
140
# 将数据写入数据库
下面就可以将前面费了好大劲写的种子数据写入到数据库了。
# 在添加数据之前需要创建数据库
但是我们不要急于写入数据,现在还没有数据库。一切已经准备就绪,我们只需要通过几行命令就可以轻松创建数据库。
在 vs 的控制台直接执行命令是最简单的方式,依次执行:
PM> add-migration InitialIdentityServerPersistedGrantDbMigrationMysql -c PersistedGrantDbContext -o MigrationsMySql/PersistedGrantDb
Build started...
Build succeeded.
To undo this action, use Remove-Migration.
PM> update-database -context PersistedGrantDbContext
Build started...
Build succeeded.
Done.
PM> add-migration InitialIdentityServerConfigurationDbMigrationMysql -c ConfigurationDbContext -o MigrationsMySql/ConfigurationDb
Build started...
Build succeeded.
To undo this action, use Remove-Migration.
PM> update-database -context ConfigurationDbContext
Build started...
Build succeeded.
Done.
PM> add-migration AppDbMigration -c ApplicationDbContext -o MigrationsMySql
Build started...
Build succeeded.
To undo this action, use Remove-Migration.
PM> update-database -context ApplicationDbContext
Build started...
Build succeeded.
Done.
1
2
3
4
5
6
7
8
9
10
11
12
13
14
15
16
17
18
19
20
21
22
23
24
2
3
4
5
6
7
8
9
10
11
12
13
14
15
16
17
18
19
20
21
22
23
24
提示
因为可能版本不一致,旧版的 update-database 的 -c 是没有问题的,但新版由于新增了参数,会报冲突,使用全称即可。
下同,但全称是 --context。
也可以通过 dotnet 命令执行,需要先安装 Entity Framework Core CLI,并在项目中安装 Microsoft.EntityFrameworkCore.Design:
dotnet tool install --global dotnet-ef
dotnet add package Microsoft.EntityFrameworkCore.Design
1
2
2
然后依次执行下面命令:
dotnet ef migrations add InitialIdentityServerPersistedGrantDbMigrationMysql -c PersistedGrantDbContext -o MigrationsMySql/PersistedGrantDb

dotnet ef database update -c PersistedGrantDbContext

dotnet ef migrations add InitialIdentityServerConfigurationDbMigrationMysql -c ConfigurationDbContext -o MigrationsMySql/ConfigurationDb

dotnet ef database update -c ConfigurationDbContext

dotnet ef migrations add AppDbMigration -c ApplicationDbContext -o MigrationsMySql

dotnet ef database update -c ApplicationDbContext
1
2
3
4
5
6
7
8
9
10
11
2
3
4
5
6
7
8
9
10
11
运行之后,可以看到在项目中多了一个 MigrationsMySql 的文件夹,里面有很多自动生成的文件:
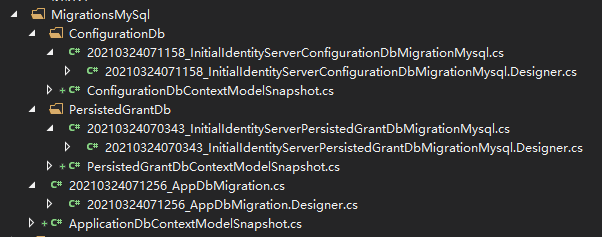
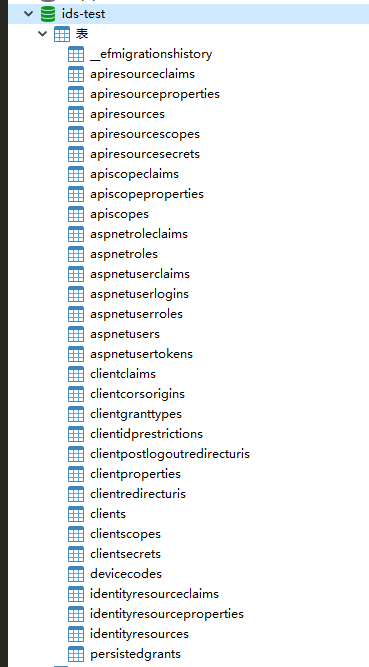
同时,在数据库中可以看到已经生成了对应的表:
提示
生成的文件为模型文件,如果没有修改我们的自定义实体模型,可以一直使用,只需要执行 update 命令即可创建数据库。如果修改了模型结构,将整个文件夹删掉重新生成,并执行全部命令即可。
# 将写好的数据通过命令添加到数据库
通过命令创建的项目中,已经贴心的为我们添加好了添加数据的命令,甚至在我们刚刚创建好的时候就会询问我们是否需要执行它。如果我们一开始就运行了,那么在项目根目录下回生成一个 IdentityServer.db 数据库文件,它是 SQLite 格式的。因为我们现在使用 MySQL,所以需要重新跑一遍。
空项目自行配置的也没关系,可以将下面代码粘贴到 Program.cs 文件中:
public static int Main(string[] args)
{
    var seed = args.Contains("/seed");
    if (seed)
    {
        args = args.Except(new[] { "/seed" }).ToArray();
    }

    var host = CreateHostBuilder(args).Build();

    if (seed)
    {
        Log.Information("Seeding database...");
        SeedData.EnsureSeedData(host.Services);
        Log.Information("Done seeding database.");
        return 0;
    }

    Log.Information("Starting host...");
    host.Run();
    return 0;
}
1
2
3
4
5
6
7
8
9
10
11
12
13
14
15
16
17
18
19
20
21
22
2
3
4
5
6
7
8
9
10
11
12
13
14
15
16
17
18
19
20
21
22
这样,我们通过命令行启动项目,并且输入 /seed 参数的时候,它就会执行前面写的内容将种子数据添加到数据库中。
可以通过命令行运行项目:
dotnet run /seed
1
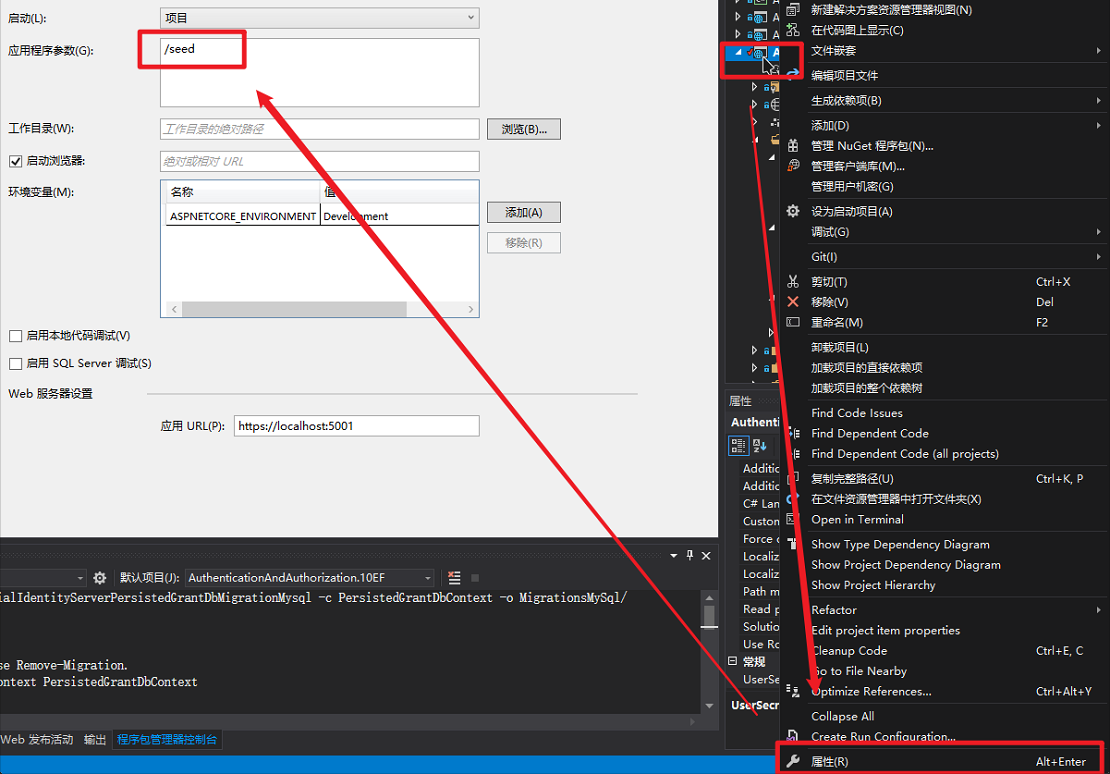
同时,也可以在 vs 中添加参数执行,不要忘记执行之后删除就行,项目属性添加即可:
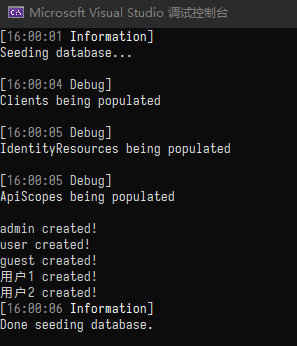
运行项目,在控台看到如下信息则表示已经成功:
同时在数据库可以看到数据已经写入:
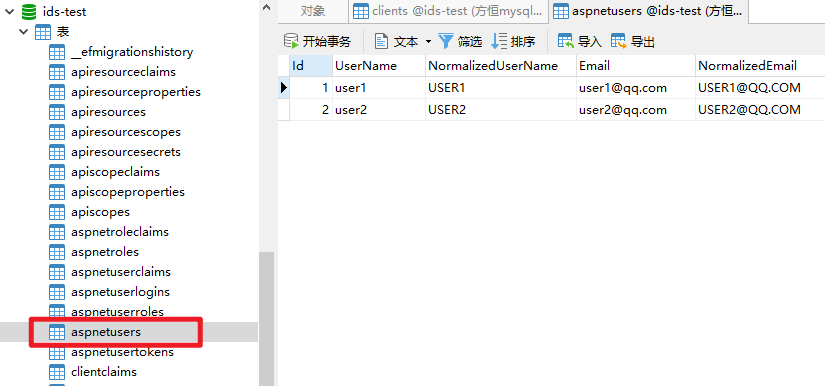
# 使用数据库的数据
删掉项目属性中的 /seed 参数,或者直接命令行启动项目,使用我们创建的用户登录:
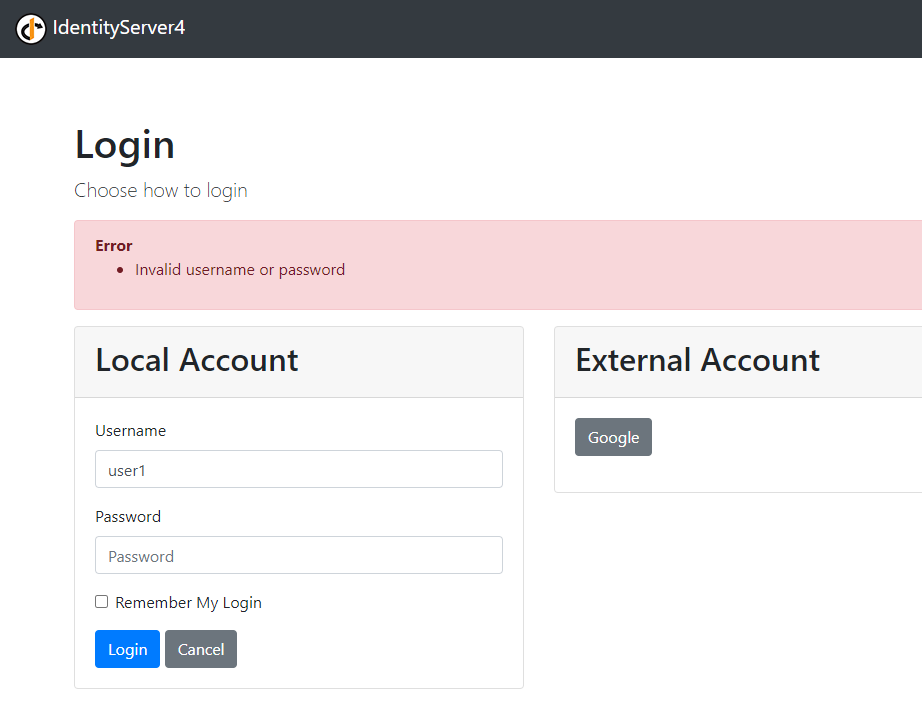
发现并不能成功登录。不要灰心,因为我们还没有修改控制器的内容。
# 让控制器可以调用数据库
找到 Quickstart/Account/AccountController.cs 文件,在构造器中可以发现它目前使用的用户仍然是测试账户信息,修改构造器的内容:
public AccountController(IIdentityServerInteractionService interaction,
    IClientStore clientStore,
    IAuthenticationSchemeProvider schemeProvider,
    IEventService events,
    UserManager<ApplicationUser> userManager,
    SignInManager<ApplicationUser> signInManager)
{
    //_users = users ?? new TestUserStore(TestUsers.Users);

    _interaction = interaction;
    _clientStore = clientStore;
    _schemeProvider = schemeProvider;
    _events = events;
    // 添加用户管理器
    _userManager = userManager;
    // 添加登录管理器
    _signInManager = signInManager;
}
1
2
3
4
5
6
7
8
9
10
11
12
13
14
15
16
17
18
2
3
4
5
6
7
8
9
10
11
12
13
14
15
16
17
18
并生成只读的 _userManager 和 _signInManager:
private readonly UserManager<ApplicationUser> _userManager;
private readonly SignInManager<ApplicationUser> _signInManager;
1
2
2
# 修改登录方式
找到登录函数:
[HttpPost]
[ValidateAntiForgeryToken]
public async Task<IActionResult> Login(LoginInputModel model, string button)
{
    // ...

    if (ModelState.IsValid)
    {
        // ... 登录验证部分
    }

    // ...
}
1
2
3
4
5
6
7
8
9
10
11
12
13
2
3
4
5
6
7
8
9
10
11
12
13
找到其中的登录验证部分,并完全将其替换为如下内容:
if (ModelState.IsValid)
{
    // 允许用户使用用户名
    var user = await _userManager.FindByNameAsync(model.Username);

    if (user != null && user.Validity)
    {
        // 使用密码验证
        var result = await _signInManager.PasswordSignInAsync(user.UserName, model.Password, model.RememberLogin, lockoutOnFailure: true);
        if (result.Succeeded)
        {
            // TODO 更新登录信息

            await _events.RaiseAsync(new UserLoginSuccessEvent(user.UserName, user.Id.ToString(), user.UserName));

            // make sure the returnUrl is still valid, and if so redirect back to authorize endpoint or a local page
            // the IsLocalUrl check is only necessary if you want to support additional local pages, otherwise IsValidReturnUrl is more strict
            if (_interaction.IsValidReturnUrl(model.ReturnUrl) || Url.IsLocalUrl(model.ReturnUrl))
            {
                return Redirect(model.ReturnUrl);
            }
            return Redirect("~/");
        }
    }
    await _events.RaiseAsync(new UserLoginFailureEvent(model.Username, "invalid credentials"));
    ModelState.AddModelError(string.Empty, AccountOptions.InvalidCredentialsErrorMessage);
}
1
2
3
4
5
6
7
8
9
10
11
12
13
14
15
16
17
18
19
20
21
22
23
24
25
26
27
2
3
4
5
6
7
8
9
10
11
12
13
14
15
16
17
18
19
20
21
22
23
24
25
26
27
# 修改登出方式
找到登出函数,并进行修改:
[HttpPost]
[ValidateAntiForgeryToken]
public async Task<IActionResult> Logout(LogoutInputModel model)
{
    // ...

    if (User?.Identity.IsAuthenticated == true)
    {
        // delete local authentication cookie
        //await HttpContext.SignOutAsync();

        // 注释掉上面的模板登出,改为下面的通过管理器登出的方式
        await _signInManager.SignOutAsync();

        // raise the logout event
        await _events.RaiseAsync(new UserLogoutSuccessEvent(User.GetSubjectId(), User.GetDisplayName()));
    }

    // ...
}
1
2
3
4
5
6
7
8
9
10
11
12
13
14
15
16
17
18
19
20
2
3
4
5
6
7
8
9
10
11
12
13
14
15
16
17
18
19
20
# 完成
现在重新运行项目,通过创建的用户登录,发现已经可以正常登录。
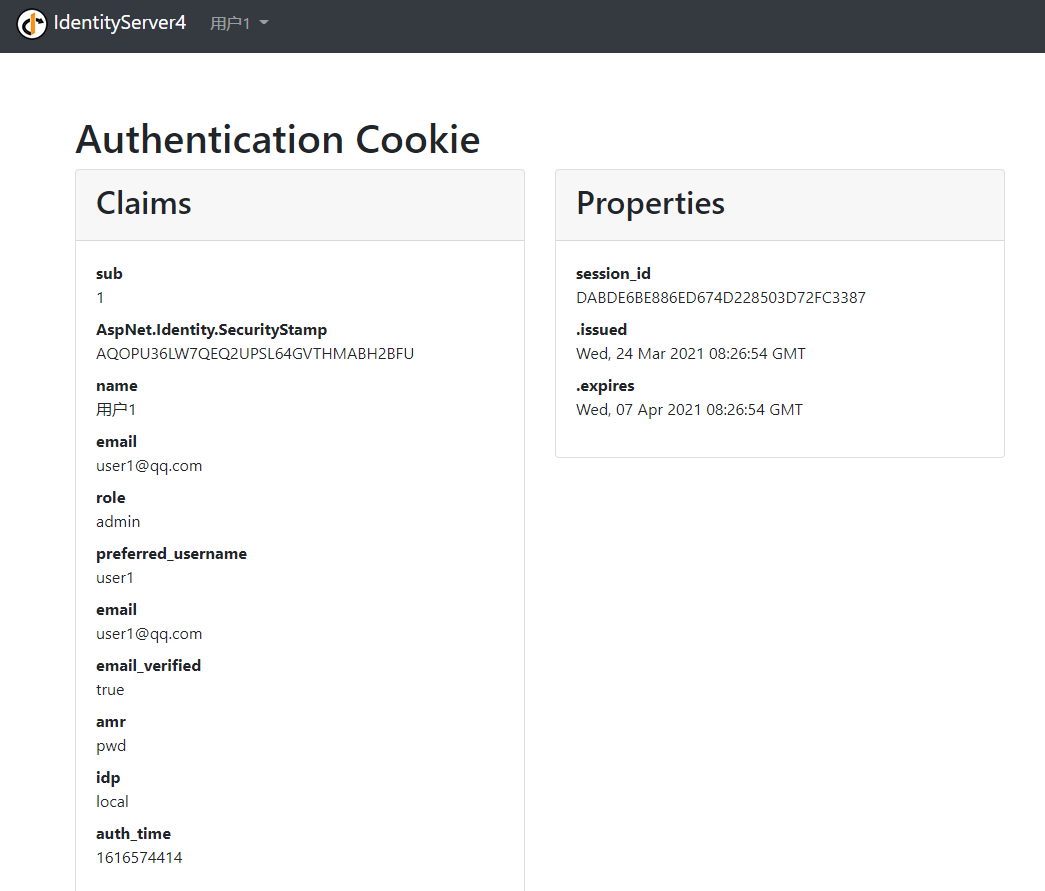
至此,整个项目已经完整的使用了数据库,后面可以围绕数据库的数据进行任何操作。
# 说明
上文中出现 Log 对象,可以参考 SeriLog 的使用